
Redesigning & rebuilding my 'house'
- Dec 7, 2020
- 4 min read
Let me begin by stating the obvious... it is GREAT to be back in Aussie & back to my journey of adventure & discovery!.
I have been here almost 2 weeks now and every day so far has been warm and sunny.
EVERY day!
While I've been away these past 8 months I had plenty of time to consider the pros & cons of my initial camper fit-out.
Outcome = redesign.
The design stage is so much fun & a good way to use my spare time while 'trapped in NZ. Online 'research... i.e. searching through YouTube videos, images,; using OneNote to add sketches to photos of the stripped out interior.
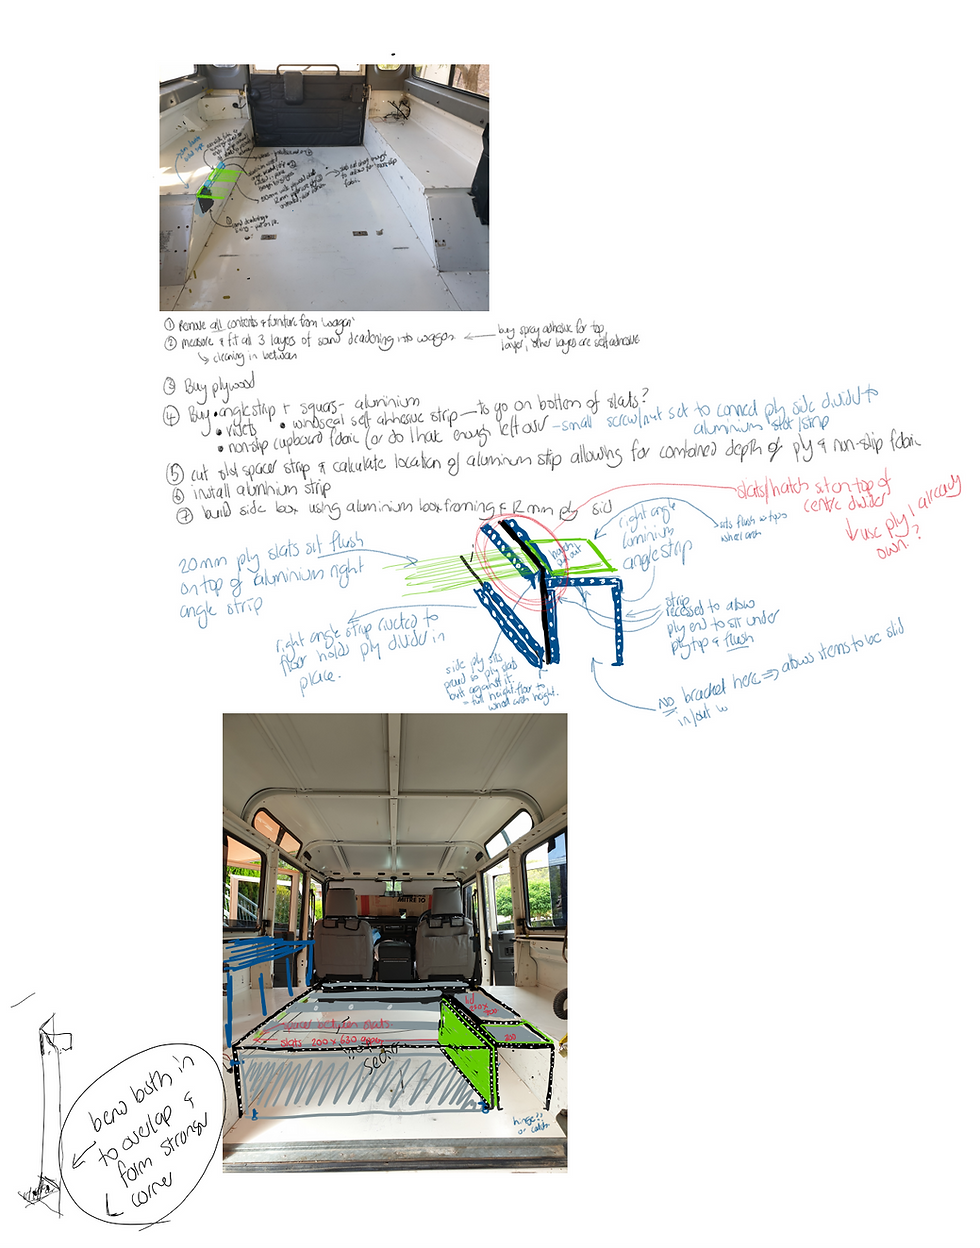
I have spent the past week or so turning my design ideas into reality. Long days on the 'tools': measuring, cutting, drilling, varnishing, drilling, fitting and crashing to sleep physically exhausted at the end of each day.
I am using a mates place as a base for the rebuild, based in Lennox Head, NSW. The sunrises here around 5.30am & by 8.30am it is hot, so I have been starting by 6.30am most mornings.
Parking the Landy under shade of large trees & enjoying the company of a curious young magpie who lives in the trees.
NOTE: do not leave your lunch unguarded with a curious magpie around!!... no lunch left for me.
PROCESS
Days 1-2
Strip out old interior
Clean
Add sound deadening throughout


Photo below shows front seats out, exposing the storage boxes underneath.
Battery out.

Treated some minor surface rust in the battery box before lining.

Now lined and looking super tidy.

Pic below shows font section all lined with stage 1 of the sound deadening process.
Thankfully the front seats were easy to remove & reinstall.

Pic below shows the rear section fully lined with sound deadening stage 1


Pic below shows the ceiling now also lined with stage 2 of the sound deadening.

And voila !....
Not a professional-quality install, but I am very happy with the results.
I will line the ceiling once I have finished all cabinetry & installing the new lights I want.

As I decided not to line the inside of doors at this stage, I had some sound deadening left over, so decided to use that to line the bonnet.
Thankfully the bonnet of the Landy is reasonably easy to remove and replace.

Treated a few spots of minor rust I found along structure before lining.


Bonnet now well lined, hood lining reinstalled and about to climb up on the Landy to put in back on,

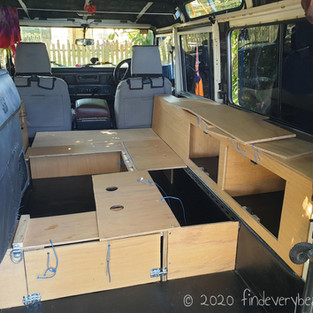
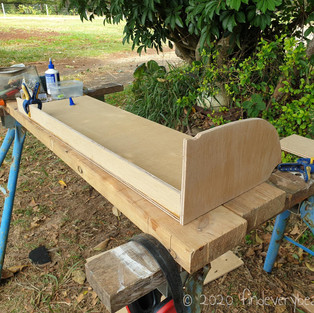
Days 3-5
Buy marine grade 9mm ply plus bits n pieces... glue, screws, brackets
Measure, cut and build & install


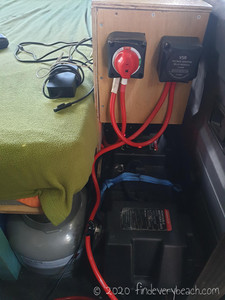
Days 5-7
Wiring- install VSR (Voltage Surge Regulator) & fit solar controller, battery & switches into new location
Adapt & adjust design according
Buy & fit mattress


Days 7-8
Install fridge in new location
Install sink into new location
More work on wiring solar system


Ticking off items from my checklist:
Need to be able to sit up comfortably inside with plenty of head room
Need to be able to sleep comfortably inside
Need to be able to cook inside
Need easy access to storage of sports toys (kites etc)
I am happy to say that the rebuild has checked all those items off.
The sound deadening is incredibly effective!!.
Well worth the $1000 approx spent on the product.
Thanks to carbuilders.com.au for the video they posted on YouTube on installing the sound deadening, which not only inspired me to purchase from them, but also was very useful guide throughout the process.
The finished product... take a quick tour through it with me here;
I have been adventuring for a week since making the video above and the systems are working exceptionally well. This version of the interior is so much more practical than my previous version, I am LOVING it.
Roadside repairs & maintenance
I learnt a few days into my holiday that my fridge was not operating properly.
when on the 'house' battery only and assumed there was a wiring fault.
There was a wiring fault, the earth to my VSR was not properly connected... I sorted that at a road side stop point, but the fridge continued to not function well.
Here is quick vid of one of my off-the-grid repairs/maintenance to my wiring setup.
Not having a working fridge was pretty limiting.
It would mean that I would be unable to go on any multi-day treks.
I made the call to drive from the remote national park I was in that day to the nearest Jaycar Store (about a 4 hour drive) to have the fridge replaced under warranty. Yes a 4 hour drive, which I considered worth it.
Jaycar replaced my fridge under warranty, Yah for a new fridge which functions perfectly!
While I had been away for 8 months trapped by international travel restrictions I damaged my house battery as I left it connected improperly to the starter battery... so while at Jaycar I bought 2 new lithium-ion long-life batteries and a few other things including an emergency Engine starting power bank. Spent quite a lot, but well worth it.
End result - working fridge, loads of storage for solar energy, confidence that if my engine starting battery fails I have the equipment to start it myself and I feel so much more relaxed knowing all of that.
I would like you to meet this wonderful creature who kept an eye on the Landy refit most days
This is the location of where I have done the refit - Skennards Head, NSW


Comments